Food Photography Tips! Your complete guide to create Professional Food photographs.
- munish khanna

- Apr 6, 2023
- 6 min read
Updated: Jun 3, 2023
For any form of Photography, natural light is the best but for practical purposes, we do not have favourable natural light available to us all the time. So, it's important to have a good understanding of light as it exists in nature to create images that appear as natural as possible. Food should look real and tempting. In real-life circumstances, we have this sense of Smell and touch as well but in photography, we are working without these two and our only strength is to work around what is visible to the eye.

Photography: Munish Khanna
Keep it Natural
As discussed, keep the lighting as natural as possible. For this, it's important to understand the natural lighting principles in depth. Get an idea about how light exists in nature and follow the same. Light always comes form the higher direction ( Sun is always up except at a lower angle during the sunrise and sunset), Light casts shadows, Everything is visible to the eye even if it is a darker part of the scene.
Must-Have Equipment for Food Photography
High-resolution Camera works better.
This is one genre of photography where you do not need speed and portability as such. Yes, you need the speed to shoot fast before the food gets spoiled but not as fast as you need to be in sports photography.
I prefer to shoot with a medium format camera as much as possible. It has a bigger sensor and most importantly higher dynamic range which allows me more control over the images I create.
It's always slower to shoot with a medium format camera as these are relatively bulkier and slower at focusing and other parameters in comparison to full-frame DSLR or Mirrorless cameras. Always opt for a high-resolution Full frame camera.
Macro lens
Depending on the size and layout of your food, you may need to change your lenses but a Macro lens is a must-have as it allows you to go really closer to the food, you are photographing. This helps you reveal the fine texture, the tactile quality and most importantly, the separation of key food elements from the remaining areas.
I generally prefer to use fixed focal length lenses if not using my 100 mm macro both on canon as well as Mamiya.
Tripod
Food photography involves a whole lot of planning and further evaluation to improve the photographs that are created not only in terms of technical aspects of Photography and lighting but in the overall sense of the way Food is appearing in the pictures. You may need to add or remove or adjust certain elements to make the images look more appealing.
If the Camera is on the tripod, you get one defined viewpoint to work on and set up your lighting in accordance. This is your reference point of all the lighting and composition, especially when a lot of elements, which is typical of food photography, are involved.
Macro lenses have a very shallow depth of field. keeping the camera on the tripod ensures that one is focusing exactly at the right spot. Handheld, however steady your hand may be, chances are you may end up having the wrong element in focus instead.
Opt for a Pan and Tilt head on the laptop as that allows independent control over panning and tilting. Ball and Head tripods are better where you need more flexibility but the moment you loosen it, you need to set all axis again. This works better in situations where you want stability yet need to shoot quickly.
Lens Hood
Often you may end up getting flare in your lens while shooting against the light. Having backlighting helps accentuate the characteristics of Food. Keeping a lens hood on, keeps you safe.
Shoot tethered
There is a lot going on when we shoot Food. A lot of aspects both technical and compositional in nature, need to be kept in mind. When you connect the camera to the computer, you are able to control the camera right from your computer and also instantly see and evaluate images in your Camera's Image transfer and RAW converting software. I usually Connect a 27" iMac so that I can also quickly covert and see the images on Adobe Photoshop as well.
Add Warmth
Food and Warmth go hand in hand. While shooting with strobe lights with a modelling light, It's a good idea to use a slightly slower shutter which allows the influence of the tungsten light as well on the elements in the frame. Ensure that your camera is on the tripod and there are no other unwanted lights like fluorescent ones which may put their own cast. Exposure also needs to be balanced so that it does not lead to unnecessary overexposure. The warmth may also be selectively added by just illuminating key areas or elements with tungsten lights. Another alternative is to add a warm gel in from of the lights or just certain specific lights.
Digitally, of course, you can adjust the white balance to strike the right balance of warmth in your photograph.

Photography: Munish Khanna
Work with a Food Stylist
Having a stylist on board makes things easier for you as you get extra hands at setting up the shot and the contents helping you concentrate on the lighting and composition to bring out the best in both technical and aesthetic aspects. The stylist will ensure that you have the food the way it should be along with all required cutlery and props. Of course, you as a Photographer still have the final say because you are the one who is actually seeing how the overall combination of elements appears in the frame of your camera.
Food stylists are almost always chefs, who specialise in cooking the food the way it would appear and not how it would taste. They have special artificial elements, which substitute for the real food helping it appear better. However, as a Photographer, with very high-resolution cameras, it is your job to ensure that the real and the artificial elements blend together and everything looks as great as it is planned out.

Photography by Any Lane
Show Detail
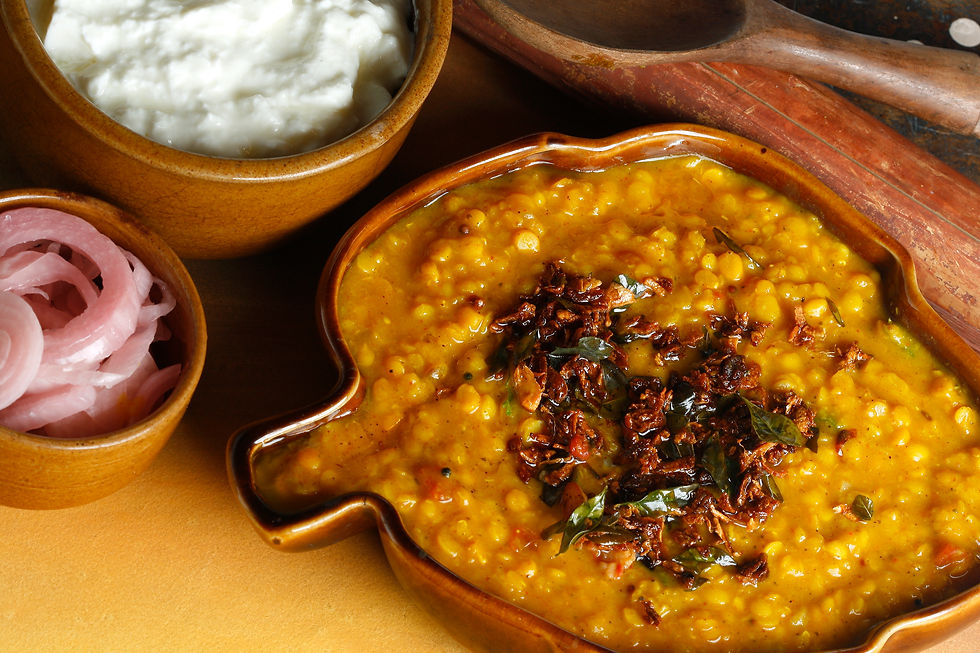
Texture, color, Shape and form are the key factors in Food photography. With the help of your photography equipment and lighting try to reveal these in your photographs as per the kind of food being photographed.

Photography by Munish Khanna
Create Separation
Create a separation between your main dish and the other accompaniments and props.
Use a shallow depth of field
Use a wide aperture (low f-stop number) to blur the background and focus on the food. A shallow depth of field can create a soft and dreamy look to your food photography, keeping the main area to be highlighted in sharp focus as compared to the background or other areas.
Use Differential lighting
Our eye always sees the brightest part first. Keeping the main area bright with the surrounding background and other elements relatively dark helps accentuate the main Dish. The difference in exposure may be subtle but it does have an impact.
Explore all angles and perspectives
Experiment with different angles and perspectives to create unique and interesting images. Before you begin to shoot, try viewing from above, at eye level, or from a low angle to freeze the best possible angle.
Add Props that work
Use props to enhance the styling of the food. For example, use herbs, flowers, or utensils to add interest and color to the image. However, these should be such which help the main food dish stand out and not distract or take away the attention from that.
Photography: Munish Khanna
Background
Besides the props, the background plays a crucial role in food photography. Choose a simple and clean background that complements the food. Use backgrounds that add interest to the image without distracting from the food. The Background should be subtle and not overpower the food in terms of its own texture and color.
Edit the images yourself
Editing is an important part of food photography. Use software, first, the RAW converter itself to adjust colors, brightness and contrast and then Adobe Photoshop to Remove or adjust any distractions or blemishes in the image. It's always good to make whatever adjustments are possible in the RAW file and then make only the remaining manipulations in TIFF format. Convert them to JPEG as the last step.
It's better to edit yourself as it's actually an extension of the image creation process. You can cover up for the limitations which you have had while shooting and bring out the best in the way you had planned to express your photograph in terms of its mood and quality.
Keep it Simple
Less is often more in food photography. Focus on the food and keep the styling simple. Avoid cluttering the image with too many props or distracting elements. Add up more lights to illuminate only if they are contributing to the image. One light is often sufficient to create good lighting and the remaining if any should just be supportive in nature.

Photography: Munish Khanna


Comments